Note: In the article, I have added VBA codes of some of the tools that I have developed. However, all of them can be done manually. Using the script will only improve efficiency.
Have you looked at an excel model that you (or someone else) have created in the past, and thought… “How did I (he/she) calculate this number?”, “What’s this number that I (he/she) hardcoded into this cell?”, “What’s the source of this assumption?”, “This model is horrible. It will take ages to understand this”. Then, most of the time you are helpless (especially if the person who built the model is uncontactable) or you spend hours figuring it out yourself. If the model was properly documented, none of this would have occurred. And a properly designed and documented model will say a lot about the person who created it.
The best way to understand a person is to get them to create an excel model…
When I was in Engineering school, in every software language that I learnt, one of the very first concepts that’s taught is “commenting” ie. documentation. Due to the complexity and collaborative nature of software development, documentation plays a pivotal role in writing good code. Building a complex financial model is no different. Hence, the importance of documentation applies to financial modelling too.
Below I discuss the concept of documentation, in the context of financial modelling and the use of excel. The outcome of reading this should be to develop your own documentation workflow using these techniques.
1. Versioning & Background
1.1) Create proper versioning
If you’re building a complex model in excel, you will likely build multiple iterations of the same model. And sometimes you will have to go back on certain changes that you did before. In such cases, identifying the changes that you did in each iteration will enable you to easily fall back to a previous version.
In situations where there are many versions, I maintain a separate sheet called “versions”. This sheet includes the changes that I did in each version. When I was developing a rate-card model for a telecommunications infrastructure company, I had to create 56 published versions over multiple years. (Similar to releases in software) This practice is really helpful in instances like those.
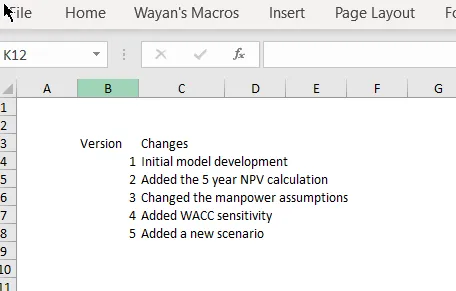
And for the creation of the version (or backups), I wrote a macro. This automatically prompts me for a comment to be added to the end of the file name. Then it creates a backup of the file in the same folder with the filename format.
File Name yymmdd_hhmmss (comment)

Eg. myfile 201119_112428 (with 10% COC)
This helps me identify the relevant version quickly because when I order the files by name, the latest file will be at the bottom and each will have a meaningful comment at the end of the filename.
Sub Tool_WorkBook_Backup()


    Dim BaseFileName As String
    Dim FileNameArray() As String
    Dim Comment     As String


    ' to check whether the workbook is saved at least once. if a workbook is not saved at least once (ie. book1, book2 etc) it will not have a path.
    If ActiveWorkbook.Path = "" Then
        MsgBox "The workbook is not saved"
        Exit Sub
    End If


    'Step 1: Check whether the user wants to create a comment in file name
    Comment = InputBox("Insert the comment", 1)

    ' if user has entered a comment, format it with the paranthesis
    If Comment <> "" Then
        Comment = " (" & Comment & ")"
    End If
    ' if user cancels, stop the macro without saving a file
    If StrPtr(Comment) = 0 Then Exit Sub

    'Step 2: Create a Backup of a Workbook with Current Date in the Same folder
    ' Preapare the file name and extension
    FileNameArray = Split(ThisWorkbook.Name, ".")


    If ThisWorkbook.Name = "Personal.xlsb" Then Exit Sub

    ' Save a copy
    ThisWorkbook.SaveCopyAs _
    Filename:=ThisWorkbook.Path & "\" & _
    FileNameArray(0) & " " & _
    Format(Now(), "YYMMDD_hhmmss") & _
    Comment & "." & _
    FileNameArray(1)

End Sub
1.2) Add a “Background” sheet
This is to provide a background about the model/working. This will be especially useful if the model involves different business processes and domain knowledge. I generally include meeting notes, screenshots of the relevant emails, location of certain documents that I referred to, Process flow charts and block diagrams etc. in this section. This has literally saved me in so many Internal and External Audits.
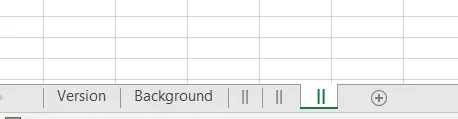
I have developed a separate macro to create these two sheets, along with some sheet separators, with a single click. (As shown in the above picture.) The code is below.
Sub addsheet()
    ' add sheets to the workbook
    Sheet_Exists ("|| ")
    Sheet_Exists (" ||")
    Sheet_Exists ("||")
    Sheet_Exists ("Background")
    Sheet_Exists ("Version")

End Sub


Function Sheet_Exists(WorkSheet_Name As String) As Boolean
    ' checks whether a sheet exists in the current workbook by the same name
    Dim Work_sheet  As Worksheet

    Sheet_Exists = False

    For Each ws In ThisWorkbook.Worksheets
        If ws.Name = WorkSheet_Name Then
            Sheet_Exists = True
        End If
    Next

    If Sheet_Exists = False Then
        Sheets.Add(Before:=Sheets(1)).Name = WorkSheet_Name
    End If

End Function
2. Cell Comments
2.1) Old Comments (Renamed as “Notes” in Microsoft 365)
These are the types of comments that we all are aware of. The “Shift-F2” ones.
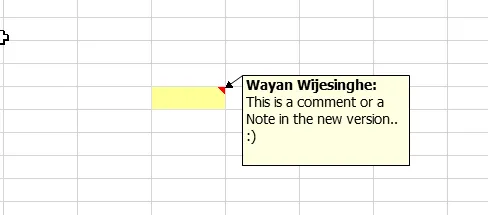
You insert using the keyboard shortcut Shift+F2 or going to Review > Notes > New Note. Personally, I prefer this type (Now called notes) over the others and use them extensively. You would mainly use this type to add more information to the cell. Eg. the Source of the data in the cell, Logic that you followed to arrive at a value.
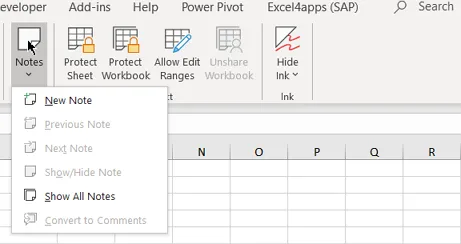
2.2) Actionable Comments (New in Microsoft 365)
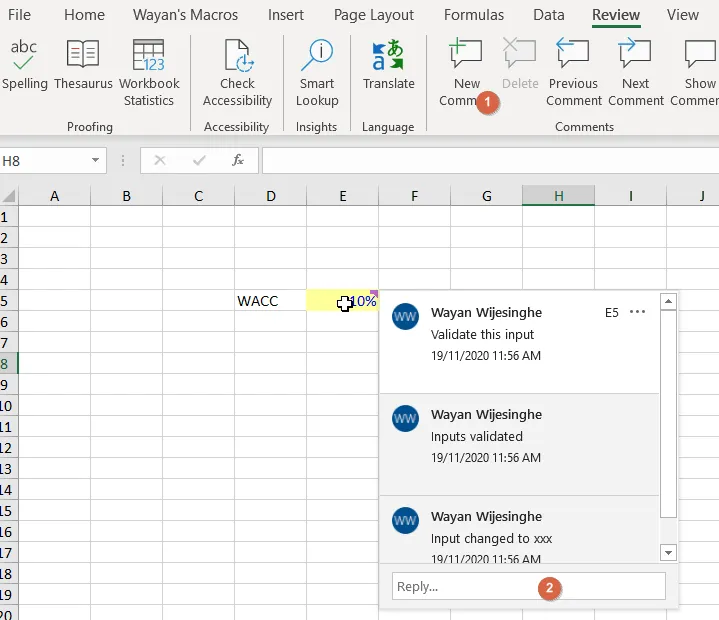
With the latest version of Microsoft 365, a new type of “comment” was introduced which can be used when you collaborate in a team. These are useful if you are entering comments to action something (Either for you or others), which can be removed once it is done (Marking as resolved). And it has a thread style where you can start a conversation with time stamps.
2.3) Inside-Cell Comments (Using excel functions)
This is a different breed of comments (similar to inline comments in coding). In this, you utilize an excel formula called “N( )”. This formula will convert any text that you type inside the parenthesis to zero. So by using this you are just adding a zero to the end of a formula. Below is an example where I’ve used it to explain the calculation of monthly cost per employee.

If I didn’t include this in the cell there is no way for someone to understand why those two numbers 8 and 22 are used. I’ve worked on models which I inherited from previous users, where there were very specific hardcoded numbers in cells, which nobody knew what those were.
3. No numbers inside formulas
You heard it right. Never insert hardcoded numbers inside formulas. Always take it out into a separate cell and label it meaningfully. This will,
- enable anyone who reads the formula to understand the logic. You hit F2, and the cell will tell the story.
- enable you to easily change that number, if the number is a variable input
- enable sensitivity analysis using “Data tables” and “Scenarios”
- “Goal Seeking” the input to achieve a set outcome
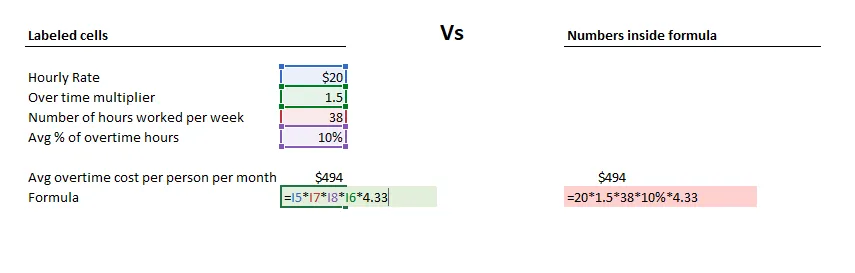
The only exception to this rule is universal constants whose meaning anyone would be able to identify the moment they see it. Eg. number of hours per day (24), number of days per week(7), months per year (12), weeks per month (4.33). Even then, it’s a good practice to include the meaning in a cell comment.
4. Never hide rows or columns. Group instead.
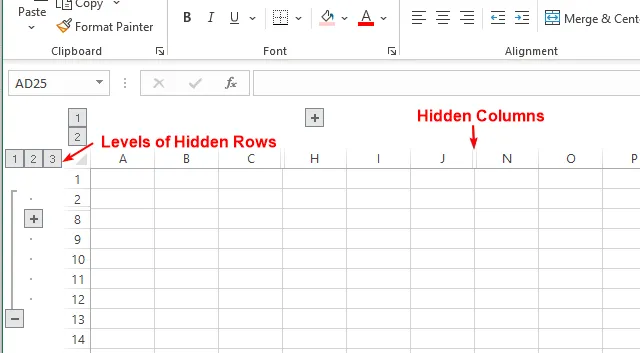
In Excel, when you hide rows or columns there is no cue of them unless you read through the row/column numbers and realize that there are some missing. When someone else uses your model or you refer to your model after some time, you can easily miss that there are hidden rows. The better option is to group. When you group, unlike hiding, it visually indicates that there are hidden rows/columns in the section.
To create a group you can go to Data > Outline Group > Group/Ungroup or simply press “Alt+Shift+Right” to group and “Alt+Shift+Left” to ungroup.
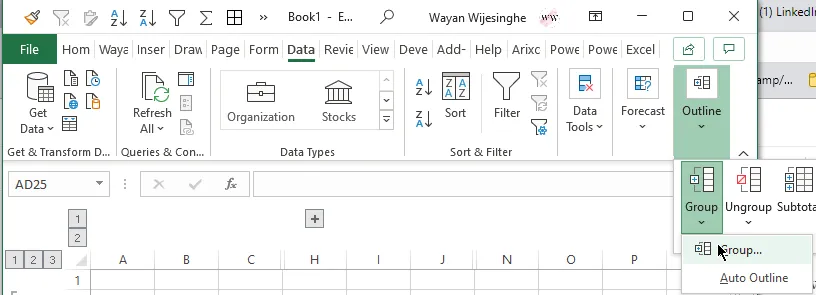
This will
- Enable one to quickly identify hidden rows/columns
- Enable to easily expand, collapse hidden rows by clicking on the +/- button or numerical level indicator.
- Create multiple levels of visibility options
5. Use colours/formatting to easily identify cell types
Using colours correctly within the model will significantly improve the readability of the model. There is a common pre-agreed formatting scheme to quickly distinguish cells based on their types. I learnt these when I was working with financial consultancy firms. They adhere to it like a religion.
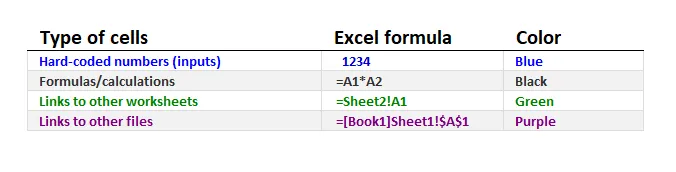
I agree… It is not practical to do this manually. The consultants have their own proprietary Excel Addons to do this automatically. However… In today’s world where opensource is dominating the proprietary, we should not back down. I’ve written my own macro to do this and you can find all my scripts on my Github Page.

6. Give meaningful names to everything
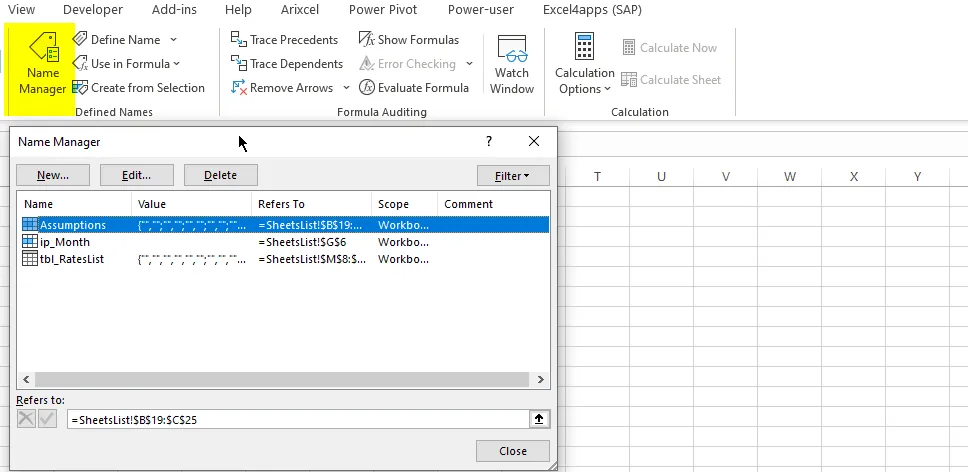
There is a reason why we give meaningful names to files. That is to quickly identify what each file contains. The same goes for the content inside a workbook too. In software development, this is applied to modules, functions, variables etc. In financial modelling this applies to table/pivot table, important cells, cell ranges, sheet names and anything that you think should have a meaningful name. The names should be meaningful and concise. This will make the workflow extremely efficient. It’s best to create your own naming convention so that using the names in the model becomes very easy. Eg. I start table names with tbl_xxxx, variable names with var_xxxxx, input names with ip_xxxx, pivot table names with pvt_xxxx etc.
6.1) Naming Cells / Ranges
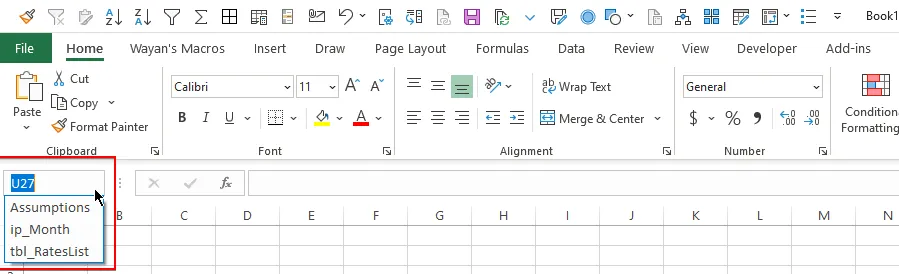
First, select the cell or range of cells that you want to name. Then either go to Name Manager (Ctrl+F3) or Name Box (Shown below) and input the name that you decide.
6.2) Naming Tables
Every time you create a table or a pivot table, remember to name it meaningfully. You can go to the relevant context-sensitive tab (“Table Design” for tables and “PivotTable Analyze” for pivot tables) and input the name and press enter. I use shortcuts to this, which is way faster. ie. Tables - Alt, JTA and PivotTables - Alt, JTN

6.3) Naming Sheets
I think sheet naming deserves a separate section. The same rules that apply to file naming apply to sheet naming as well. They should be concise and meaningful. Never keep “Sheet 1. Sheet 2. Sheet 3” in a proper excel model. I use a macro that I’ve written, to create new sheets. This prompts me for a name, every time that I create a sheet using this macro.
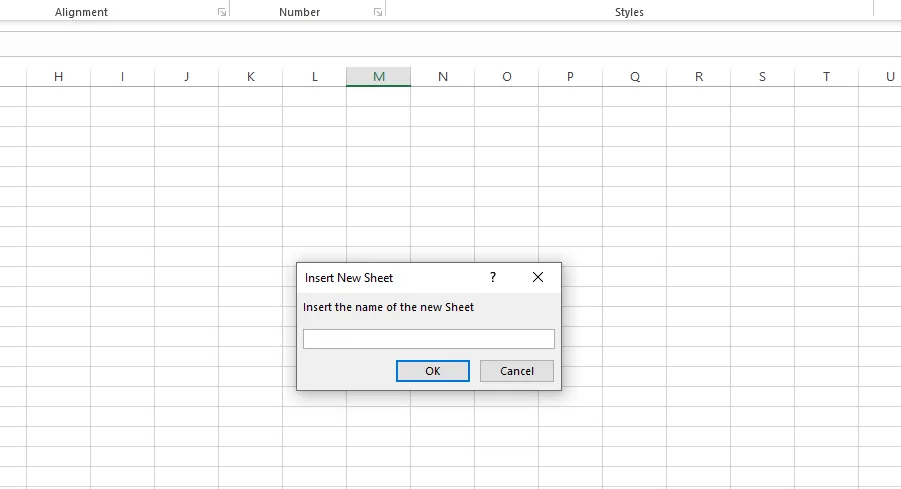
The code is below, so you can add that to your own Personal.xls with a shortcut.
Sub Sht_insertwithName_I()

    Dim NewSheet As Worksheet
    Dim sheetname As String

    sheetname = Application.InputBox("Insert the name of the new Sheet" & _
                vbCr & " ", Type:=2, Title:="Insert New Sheet")


    'Handle If User Cancels
    If sheetname = "" Then ' if user doesnt enter anything exit sub
        Exit Sub
    ElseIf sheetname = "False" Then ' if user cancels exit sub
        Exit Sub
    End If

    ' check if a sheet exists by that name and if not create sheet
    If Fnc_Sheet_Exists(sheetname) = False Then
        Set NewSheet = Sheets.Add(After:=ActiveSheet)
        NewSheet.Name = sheetname
        Fnc_NoGridZoom (NewSheet.Name)
    Else
        MsgBox ("Sheetname already exists")
    End If

End Sub
When you name your model properly, it offers the below advantages
- Easy to read and understand the model. (Reading/auditing the model)
- Quickly jump into any named element using the “Name Manager”. The shortcut is Ctrl+F3
- Quickly jump into any named range using the name box
- More meaningful formulas when you use them in formulas
 ='Sheet Name'!D4*24

vs

= var_hourlyRate * var_noOfHours

-------------------------------------------

= Table1[@Column5]*Table1[@Column6]

vs

=tbl_Sales[@Revenue] * tbl_Sales[@Commision]
7. Organize the sheets
7.1) Sheet Sections
I always create sections in my sheets. I use a blank sheet and rename that sheet with the “Section Name”. Then the viewer can easily identify the groups of sheets in that section.
The types of sections that you will create will depend on the type of model. Eg. Assumptions, Output, Calculation and (Data)Inputs.

You can also use colours to section (like below). I prefer using properly named blank sheets, as they give more information.

7.2) Table of Contents (Optional)
If you have a large number of sheets in the model you can create a “Table of Contents” page at the beginning of the workbook. This will give the viewer an instant idea about the contents of the model.
I use a macro that I’ve written, which will automatically generate a “Table of Contents” sheet that is hyperlinked to each sheet, with a click of a button. Then you can go to any sheet by clicking on the name. Also, this will identify any hidden sheets and mark them as hidden. Not only that, it will refresh the list, every time you run it, without duplicating the sheet. (Code below)
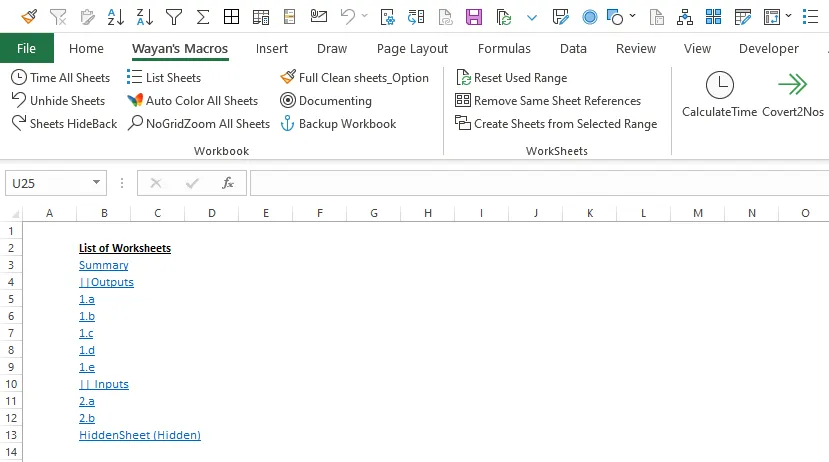
Sub Sht_SheetsList()


    Dim ws     As Worksheet
    Dim firstCell      As Integer
    Dim wsName As String


    firstCell = 3

    If Sht_Fnc_SheetExists("SheetsList") = True Then
        Worksheets("SheetsList").Range("B:B").Clear
    Else
        Sheets.Add(Before:=Worksheets(1)).Name = "SheetsList"
    End If

    With Worksheets("sheetslist").Range("B2")
        .Value = "List of Worksheets"
        .Font.Bold = True
        .Font.Underline = True
    End With

    For Each ws In Worksheets
        If ws.Name <> "SheetsList" Then

            If ws.Visible = True Then
                wsName = ws.Name
            Else
                wsName = ws.Name & " (Hidden)"
            End If

            Sheets("SheetsList").Hyperlinks.Add _
                                                Anchor:=Sheets("SheetsList").Cells(firstCell, 2), Address:="", SubAddress:= _
                                                "'" & ws.Name & "'!A1", TextToDisplay:=wsName
            firstCell = firstCell + 1

        End If

    Next ws

    Worksheets("SheetsList").Activate
    ActiveWindow.DisplayGridlines = False
    ActiveWindow.Zoom = 85
    Application.GoTo Reference:=Range("a1"), Scroll:=True

End Sub
8. Create an instructions sheet if necessary
If the model that you are preparing is intended to be re-run again by you or someone else, it is paramount to have proper instructions. You can either have it in the same model (in a separate sheet called “instructions”), in a separate document with clear references to the model, or a knowledge repository. You will definitely be thanking your past self for creating this when you run this after a few months. The more detailed the instructions are, the better it is.
9. Add last updated and data source information
Some of the models that we work on need to be frequently updated with the latest data. In my current line of work in Product Costing, there are numerous times that I have to update the input data, in each iteration. Having the “last updated date” in a visible cell will prevent you (or others) from unnecessarily updating information if it’s recently updated. It will also save you from having outdated outputs by having old input information. If the workbook is referred to by multiple people, it’s a good idea to include the name of the person who last updated the information too. I generally put conditional formatting to this cell, so it’s visible to the user whether the data is old or updated.
You don’t have to type the date and time manually. Use the Excel Shortcuts Control+; (semicolon) to insert date in the current cell and Control+Shift+; to insert the time in the current cell.
Why properly Document?
For others
The excel model that you’re building will most probably be referred to by many other people. It could be your supervisor for validation and approval… It could be another person, who will have to build a part of the same model… It could be your successor who will work with your model after you leave a particular role… For anyone who will be referring to your model, comments will be extremely valuable to understand the model and will save them a lot of time.
Unlike the comments that are done for your own use, these comments need to be very clear and detailed at the same time. Because, the other person who will be referring to them, wouldn’t have sat in the numerous meetings that you had before building the model. He/she wouldn’t know the thinking process that you went through in building it. He/she may not have the same level of knowledge about the subject in concern. Hence, the detailed nature.
For yourself
During the tenure within an organisation, how many excel models would an analyst create? And it is highly likely that after some time, you will forget certain logic, sources of information etc. In these scenarios, if you had done proper commenting in the first place, you will be thanking yourself.
Conclusion
Similar to software development, proper commenting plays a crucial role in excel model development too. Already there are signs of financial modelling evolving into a programming language. Some examples are… the introduction of the LET() function where you can define variables for reuse within a formula, the use of DAX (Data analysis expressions) in power pivot and the use of M language in power query which actually are programming languages. Not only will this save time, but also will improve the accuracy as the models evolve.
First published on LinkedIn.